Crevasse Rescue Techniques
In this article expert mountaineer Hilary Sharp details Crevasse Rescue Techniques to use when trekking. The first reaction to one of the walkers falling into a crevasse can determine success or failure.
In this follow up article by Hilary Sharp, she details Crevasse Rescue Techniques to use when trekking. Hilary is an expert mountaineer and holder of the International Mountain Leader award. She has written several guidebooks for Cicerone Press, including Trekking the Tour of Monte Rosa. She also runs her own trekking businesses offering guided walks in the Alps and Provence.
Crevasse Rescue Techniques
The first reaction to one of the walkers falling into a crevasse can determine success or failure. If the other person is pulled flat on his face then arresting the fall becomes very difficult. The ideal reaction is to jerk backwards and adopt a semi-sitting position, with the shaft of the axe plunged into the snow (see Figure 2).
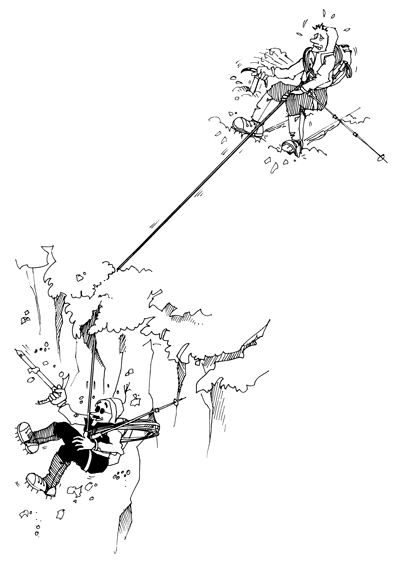
Figure Two: Crevasse Rescue Techniques
Before doing anything else the rescuer should:
- Shout to try to make contact with the victim – it may well be that by lowering him slightly he will be able to walk out of the crevasse on the other side.
- Look around for other people. A group of 4 or 5 people will be able to use brute force to pull the victim up or, at worst, help in the following stages of the rescue.
- Ascertain whether it’s possible for the victim to ascend the rope using his prussik loops, assuming he knows how to do this.
The basic belay for crevasse rescue in snow is the horizontally buried ice axe (if the snow isn’t deep enough then this is where the ice screw comes in). A slot must first be cut, using the axe, at right angles to the pull of the rope and as deep as possible. It should be the length of the axe and the forward wall should be slightly incut to avoid the axe being pulled out. A second slot, this time in line with the pull, should be cut, thus forming a T. It must be the same depth as the first slot and should rise to the surface at as shallow an angle as possible (see Figure 3). Doing this is not easy and is further hindered by the coils around the rescuer’s shoulders. These can be slipped over the head to leave the upper body free.
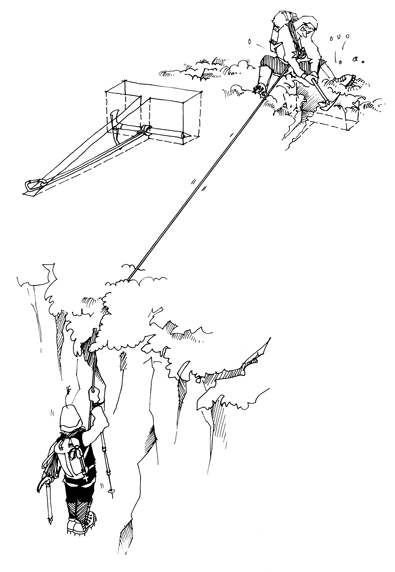
Figure Three: Crevasse Rescue Techniques
When the slot is prepared, lark’s foot or clove hitch a sling around the axe at approximately two thirds of the way up the shaft towards the head (this is to provide an equal bearing surface to prevent the axe from pivoting). The axe is pushed horizontally into the ‘tee’ of the slot and the sling laid into the right-angle slot. A krab is clipped to the sling. A prussik loop is tied in an autobloc/French prussik around the tight rope as close as possible to the krab and then clipped to this. Now the prussik is pushed forward as tight as possible and the rescuer should slide forward gently to transfer the victim’s weight to the autobloc. The shoulder coils can be undone and removed methodically and finally the rope on the slack side of the autobloc should be clipped through the krab. This is now referred to as a clutch.
For the rescuer to operate in safety he must be attached to the belay. The easiest way to do this is to attach himself temporarily to the belay with one prussik, then untie from the end of the rope and clip this to the belay. He should then attach himself to the rope via an Italian hitch into the screwgate krab on his harness. He must carefully approach the edge of the crevasse, paying out the rope through the hitch (effectively abseiling , although not necessarily weighting the belay). Having ascertained that the victim needs pulling out, the edge of the crevasse must be prepared by pushing trekking poles under the rope as near to the edge as possible to prevent further cutting into the lip. The remaining snow lip can be broken away. The victim must now be told to clip his ice axe and pole to his harness (see Figure 4).
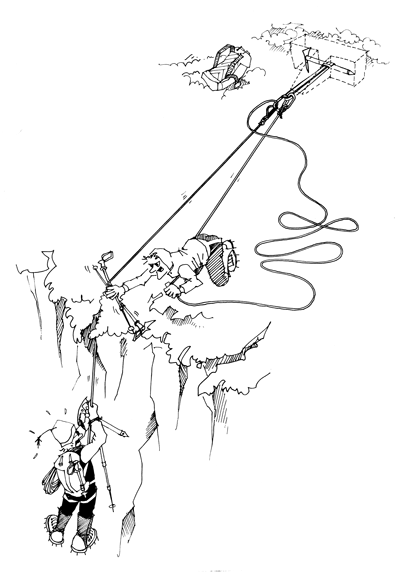
Figure Four: Crevasse Rescue Techniques
If the rope hasn’t bitten too far into the lip or the weight/strength difference of the walkers isn’t to the rescuer’s disadvantage, it might be possible to lift the victim using a 3:1 pulley system, sometimes referred to as a Z pulley. A second prussik loop is tied onto the taut rope close to the poles at the lip and a krab and pulley clipped to it. The slack rope from the clutch can now be clipped through the pulley. Pulling the rope back towards the belay now gives a mechanical advantage of 3:1. (It is important to note that regardless of whether the 3:1 will provide enough mechanical advantage or not, it is also the first stage for the improved 6:1 system.) As the victim moves upwards the autobloc forming the clutch slackens and allows the rope to run through it. When the rescuer tires he can gently release the load and the clutch will reactivate and hold the victim’s weight again. Similarly, when the pulley has been pulled up tight against the belay the clutch can be used to hold the victim while the pulley is slid back down the rope to start again (see Figure 5).
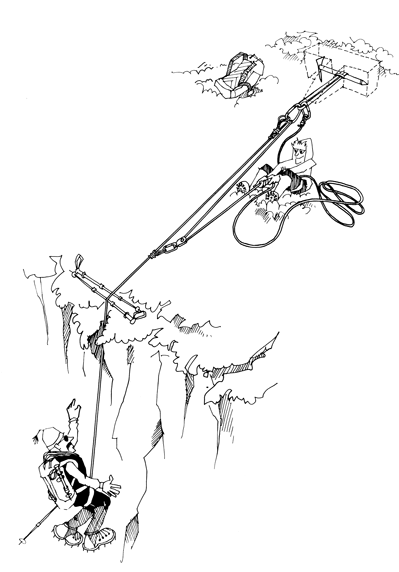
Figure Five: Crevasse Rescue Techniques
As noted above, hoisting using a 3:1 system is usually only possible if the victim is considerably lighter than the rescuer or if other rescuers are available so the next step is to quickly and easily convert your 3:1 into a 6:1.
The third prussik loop is tied onto the rope as it exits the pulley and the third krab is clipped to it. The other end of the rope – which up to now has protected the rescuer – can be clipped through the third krab. Pulling on this results in a 6:1 system. The rescuer will have a fair amount of running around to do as for every 6m of rope he pulls in the victim will rise only 1m (see Figure 6).
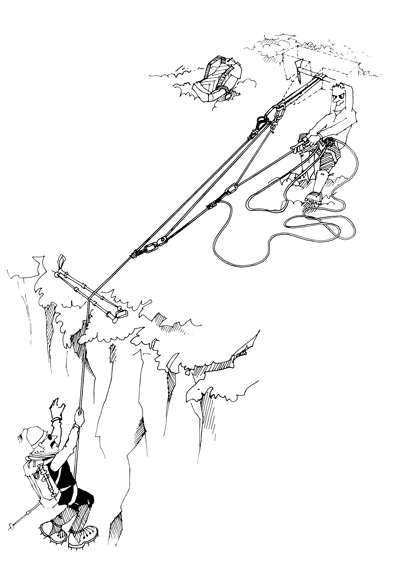
Figure Six: Crevasse Rescue Techniques
Finally as the victim nears the lip he will have to try to extract the rope from where it has bitten in by pulling and bracing his feet against the wall of the crevasse. At the last moment the rescuer may be able to crawl forward to help the victim out.


